


Cellular devices have become such an essential part of life in this day and age. People rely on these tiny computers to assist with almost all parts of life. Calling friends and family, checking the weather, searching the internet, or checking email are just a few tasks that can be completed with the modern day cell phone.
Businesses run on these devices, students supplement their learning and also their time off with phones, moms let their kids watch movies on their devices, and more. There is a place in every life with every type of person for a cellular phone, from the most advanced user to the most basic. Even very elderly folks are trying the new cell phones of today and see that they do in fact have a knack for learning how to use them (despite what they may tell their grandkids). A huge number of people today cannot imagine being without their cell phone for even a few hours. Their reliance upon these devices is so complete and total. It makes sense though. The development of cellular phones has replaced the inventions of many smaller devices made for specific purposes. Applications embedded within a cell phone have made it anything but just a way to communicate via telephone. Instead, it is really a computer, right inside the pocket of its owner, available to help at all times of the day and night. It never sleeps, it never shows disinterest, it is really a little virtual friend whenever it is needed. It can be a great assistant to its owner if said owner learns how to use it properly (which can be a challenge, I know). The problem is, it can seem complicated. It can be intimidating. Fortunately, there is a huge selection of articles just like this one to help you learn how to do tasks with your cell phone and as such, help you develop a comfort level to make this piece of technology a friend. As a friend, the benefits it can add are limitless.
It’s Usually Easier Than It Looks
Adding a contact on a cellular phone can be difficult to figure out the first time. If you aren’t very comfortable with technology, it can seem like a difficult task with a bunch of steps. Let me assure you though, it is very simple, and it makes so much sense after doing it a few times. The steps really flow into each other and don’t seem like individual movements after a few times doing it. After all, anything worth learning isn’t easy! Learning the proper way to add information to a cell phone is definitely worth learning as retaining contact information can save time, money, and prevent frustration. Let’s take a look at the steps necessary to add a new person or business to your cellular device. We will look at the steps to add one to an iPhone first then we will go through adding one to an Android device. Both devices are very straightforward and rely on photos and symbols to help users find their way around. If it makes sense, it usually works. The way these devices were designed definitely makes sense, so let’s get started.
Let’s Add a Contact to an iPhone
Step 1: Pick up that beautiful, shiny new iPhone that you finally bought (or someone bought for you because they love you and you deserve to have nice things). Unlock your iPhone by clicking the home button (if you have any other iPhone but the iPhone X). So basically, if there is a home button right in the middle of the bottom part of the screen, it isn’t an iPhone X which has no buttons on the screen at all. If you do have the iPhone X, simply tap your screen to wake it up and then swipe up on the screen with your finger starting at the base of the screen near the charging port. This will unlock your phone unless you have a passcode on it. If you have a passcode, clearly you know how to unlock it so go for it first.
Step 2: Click on the green square with the white phone icon within it. It can be anywhere on your screen as these little squares, or apps can be moved around to be personalized to your liking. Many people keep it in the little gray favorites bar at the bottom of the screen, so it might be there. It makes it easy to touch with your thumb if it is there. It not, keep looking. Simply browse through and find yours. Tap on that button lightly once you locate it.
Step 3: Once you tap on the green button, on the bottom of the screen you will see a line up of icons and words.
- “Favorites” is usually first with a little star above it, which is all of your favorite people or businesses to call. You might have this all set up by now. If not, this is definitely something you should do because it definitely saves time by showing you only the people and businesses you want to call frequently and with ease.
- “Recent” is next with a clock, which is a list of the most recent calls you have both made and received, whether or not you answered the phone.
- “Contacts” follows with a picture of a man and woman, which is where all of you contacts are kept in alphabetical order.
- “Keypad” then follows with an icon of nine dots, which is where you type in numbers if you are calling someone the “old fashioned way.” “
- Voicemail” is last which is where you have voice recordings of people who leave messages for you. You may have visual voicemail, which is a super useful feature showing you all the numbers or names if they are a contact in your phone of the people who left messages for you. Sometimes, it can even transcribe your voicemail so you can read them instead of having to listen, which is very useful if you have a hard time hearing.
Back to business, in this step, you are going to click on the icon that says “Keypad.”
Step 4: Type the phone number of the person or business into the keypad by simply tapping the screen where the numbers are. If you make an error, simply click on the little button that has the “x” on it to clear that number and try again. Don’t worry, we all make mistakes.
Step 5: The numbers which will appear at the top of the screen, and you can double check to make sure the number is correct overall. You will see a line that reads “Add Number” in blue underneath that number. It is smaller, so it might not jump right out at you, but it’s definitely there. Click on this line.
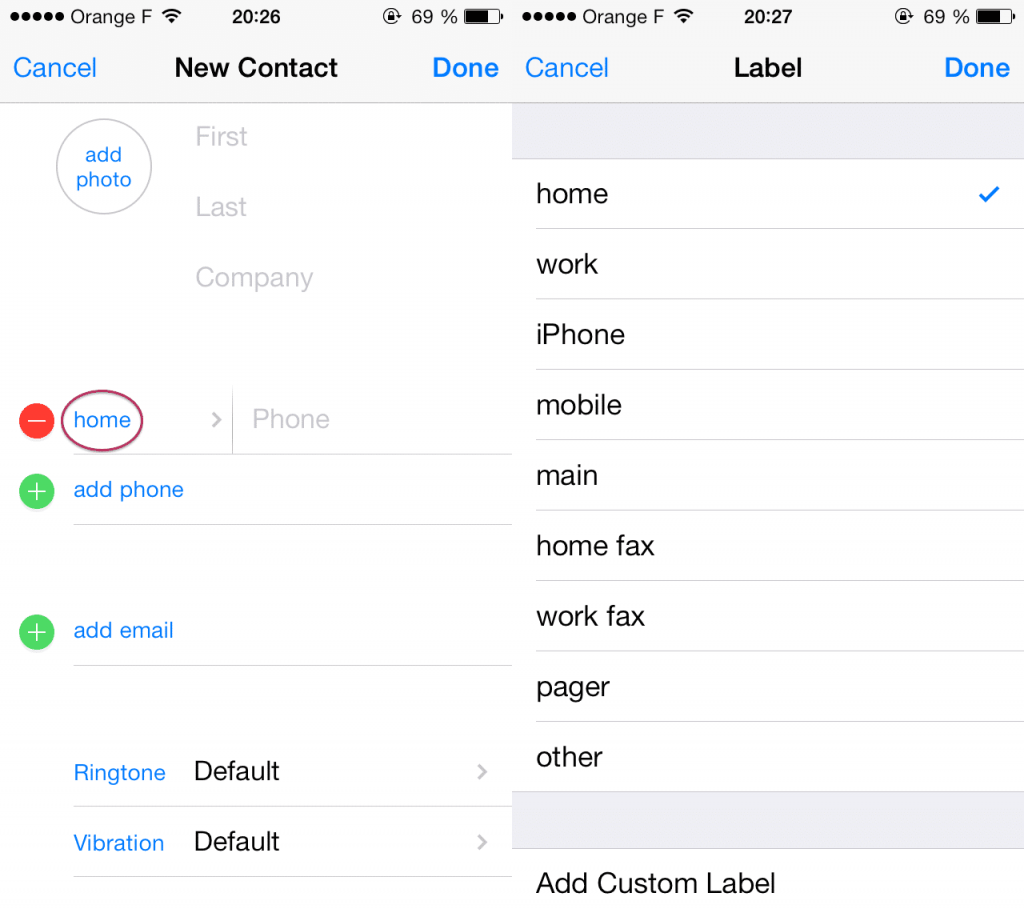
Step 6: At the bottom of the screen, three boxes will pop up. One will say “Create New Contact,” one will say “Add to Existing Contact,” and the bottommost one will say “Cancel.” You are going to click on the “Create New Contact.” You could always add it to another, but we will just say that you have never done this before and go from square one.
Step 7: A new window will pop up now. It will say “New Contact” in black at the very top of the screen. Then, there will be a place for the “First Name,” “Last Name,” and “Company” beneath. Simply tap on the screen where it says “First Name.” This is always a good place to start. A keyboard will pop up from below. Simply input the first name of the individual you are adding. Do the same for last name by clicking on that field and then using the pop-up keyboard. If it is a business, you need not add a first or last name, but instead, add the name of the business in the same way.
Step 8 (Only If You Want To): If you would like to add more information to this contact card, you have the option of adding a photo, an additional phone number, an email address, a special ringtone and text tone, website, an address, birthday, date, related name, social profile, instant message, or personalized field at the bottom. None of these are necessary but can be done if you would like to.
Step 9: Go to the upper right-hand corner and click “Done. You’ve done it! You’ve added a new contact to your iPhone device. Now, you can go to “Contacts” any time and find that listing where it is stored for your convenience.
Let’s Add a Contact to an Android Device
Android phones are also exceptional devices that have tons to offer their users. They can differ from each other a bit, so this might not be exactly the same level of precision that is present for the iPhone step-by-step above. However, it should still be able to help you with inputting a new contact to your phone. Let’s do it!
Step 1: Unlock your Android device in whatever method it prefers. Sometimes this means swiping up or from the side. Usually minimalistic and sleek, these devices make it subtle to open and as easy as possible for their users.
Step 2: Find the application, or little square, that is green with a white phone icon inside. It can be in a variety of places, however, it should be in a location that is easy to see even if it movable as this is one of the most used applications. Click on this icon.
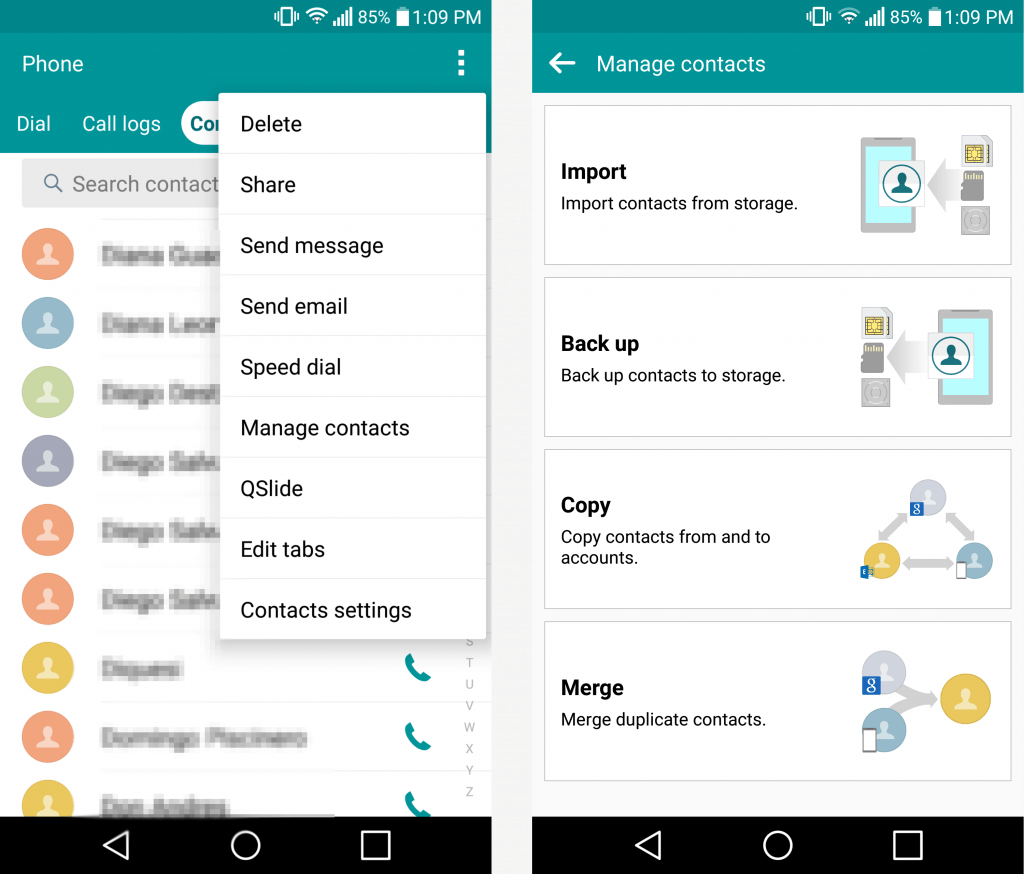
Step 3: There should be a list at the top that includes “Keypad” which is where you can put in numbers and dial the “old fashioned way.” “Logs” is next which shows a call log of all of your recent calls, both incoming and outgoing. “Contacts” is next which is a listing of all of the contacts you have added ever. “Favorites” follows which is a listing of your most used or needed numbers and names for convenience of locating and calling these people or businesses with ease. Click on “Contacts.”
Step 4: There should be a little plus symbol at the top of the screen as well. Click on the plus symbol to “add” a new contact.
Step 5: A page will come up that has room for the first name, last name, and phone number. Simply click on the first namespace to begin where a keyboard will pop up for use. Input the first name of your new contact. Then do the same to add the last name and phone number.
Step 6 (Only If You Want To): You can add a variety of other information in the same way such as such as IM or email. Simply click on the field and then use the keyboard to do so. A photo can also be added which can be great because when people call, they can easily be identified without even having to read the name of the incoming caller.
Step 7: Click “Save” at the bottom of the screen. You’ve done it! You’ve added a new contact to your Android device.
An Alternate Method If You Have a Different Android Device
Step 1: Sometimes this means swiping up or from the side. Usually minimalistic and sleek, these devices make it subtle to open and as easy as possible for their users.
Step 2: Find the application that is a little blue phone icon. It can be in a variety of places, however, it should be in a location that is easy to see even if it movable as this is one of the most used applications. Click on this icon.
Step 3: There should be a list that includes “Speed Dial” which is a listing of your most used or needed numbers and names for convenience of locating and calling these people or businesses with ease. “Recent” follows which shows a call log of all of your recent calls, both incoming and outgoing. “Contacts” is next which is a listing of all of the contacts you have added ever. Click on the blue icon at the bottom with white dots in it at the bottom of the screen.
Step 4: There should be a keyboard that appears on the next screen. Type in the phone number of the contact you are inputting.
Step 5: Click on the gray “Add to contacts” that appears at the top of the screen.
Step 6: Click on the gray “Create new contact” that appears at the top of this screen.
Step 7: A page will come up that has room for the first name, last name, and phone number. Simply click on the first namespace to begin where a keyboard will pop up for use. Input the first name of your new contact. Then do the same to add the last name and phone number.
Step 8 (Only If You Want To): You can add a variety of other information in the same way such as such as IM or email. Simply click on the field and then use the keyboard to do so. A photo can also be added.
Step 9: Click “Save” at the bottom of the screen. You’ve done it! You’ve added a new contact to your Android device.
You Can Do It
Trying to figure out the technology on your own can be very difficult, so using step-by-step articles is a very useful way to learn the proper method of doing tasks with your cellular phone. With a little practice, a cell phone can be a great personal assistant, making everyday events easier and less taxing. Other tasks with slightly more difficulty can be done with ease as well such as surfing the internet, adding an application, installing updates, taking photos, and more. Exploration of your cell phone can teach a great deal as well with gaining familiarity and comfort. Just like anything else worth understanding, there is a learning curve with new technology. In a world where not knowing about cell phone use can be a hindrance, taking the time to understand can be worthwhile. With the above steps, adding a new contact to your device should be the next thing you can tackle with confidence.